Yoga for Beginners
Yoga may seem intimidating for beginners at first. With endless images on social media of people bend into pretzel-like shapes, or standing on their heads can seem far-fetched. I am here to tell you that everyone had to start somewhere. Even those advanced yogis, started as beginners (for the most part). Yoga is a beautiful practice that can help many stay healthy, fit, grounded and happy. The point of yoga is not just to reach those ‘cool’ poses that you may see all over social media, but to reach a state of self-control and discipline in the mind and body.
Beginning your Yoga Journey
Begin your yoga journey with beginner poses, and slowly as you become more accustomed to the poses and the practice, you will naturally advance into more challenging poses. Foundation and breath is key. In this article, we will explore some basic poses that you can start with on your yoga journey. I invite you to please let go of all judgement, and learn to enjoy the journey. Let’s bring our attention to our breath first. Breath is key in yoga, without proper breathing, you will be unable to achieve the full benefits from each pose. No matter what position you are in, always try to keep your focus on your breath – breathing in and out through the nose (unless your instructor instructs you otherwise).
Once you become comfortable with your breathing, you can begin to bring your focus more on the logistics of each pose. Below you will find 6 yoga poses for beginners that you can start your yoga journey with. Please be kind to yourself, and don’t judge yourself for not being able to get into each pose with ease. Remember, usually all the teachers and yoga influencers you see, have been practicing for years before they managed to reach advanced poses. Start where you are, let go of judgement, stay present on your practice, your breath and your thoughts.
6 Yoga Poses to Try if you are a Beginner!
Child’s Pose

How to Get into this Pose:
- Start on all 4’s in a table top position.
- Open up your knees mat distance apart, and bring the big toes to touch, heels slightly apart.
- Begin to lower your hips down towards the heels (if you can’t reach your hips down, please read below on how to modify this pose)
- Extend your arms forward, and walking your hands further out towards the top of your mat
- Bring your chest and forehead as close to the ground as possible
- Stay here for 8-10 deep breaths through the nose. Use your inhale to lengthen through the back, and your exhale to go deeper into the pose.
- To come out, slowly press into your palms and begin to walk your finger tips back into seated.
Modifications:
- Place a rolled up blanket under your ankles for extra support, and rest your ankles on top.
- Rest your hips on top of a bolster or a block
- Bring a bolster in front of you, and rest your chest on top
- Use a block under your forehead
Benefits of this Pose:
- Relieves tensions and stiffness from the chest, shoulders and back
- Helps with fatigue, anxiety and stress
- Stimulates the body’s internal organs which keeps them supple and more active
Cobbler’s/ Butterfly Pose

How to Get into this Pose:
- Start in a comfortable seated position
- Bring the palms of your feet together
- Interlace your fingers around your feet or toes
- Keep your back straight
- On your inhale, lengthen through the back and as you exhale, begin to lower your chest towards the feet and floor
- Stay here for 10 breaths, deeply breathing in and out through the nose
- Once you are done, slowly roll yourself up and return back to seated
- Bring your knees in together and give your knees a squeeze
Modifications:
- Bring a block (or pillow) on either side of your knees, if you are having a hard time to bring the knees all the way down and the pose feels too intense
- Sit on a block, bolster or pillow for extra elevation of the hips
- If you are feeling a deep stretch in a seated position already, you do not have to bend forward
Benefits of this Pose:
- Stretches the inner thighs, knees, and groins.
- Helps to relieve anxiety, fatigue, and mild depression
- Stimulates abdominal organs and kidneys
- Can help with relieving menstrual discomfort and sciatica
- Great pose for calming the mind
Cobra Pose

How to Get into this Pose:
- Start in a table top position.
- Shift your weight forward and lower onto your belly.
- Bring your hands close to your ribcage, with your finger tips facing forward. Keep both of your feet grounded into the mat (the tops of your feet facing touching the ground).
- Take a deep inhale, press into your palms and lift your chest up.
- Keep your shoulders relaxing down and away from the ears and facing forward.
- Keep squeezing the elbows in towards your body, and keep a slight bend in the elbows (so that you are not locking them in).
- Stay here for 8-10 deep breaths through the nose. To come out slowly lower your chest on the ground. Bring yourself into child’s pose for a few breaths as a counter pose.
Modifications:
- Place a blanket under your pelvic for extra support and cushion
- Keep your chest lower towards the ground (don’t lift it as high as shown in the picture)
- Another option is to keep your chest on the ground, keep your arms close by your rib cage, and slowly elevate the palms off the mat.
Supported Bridge Pose
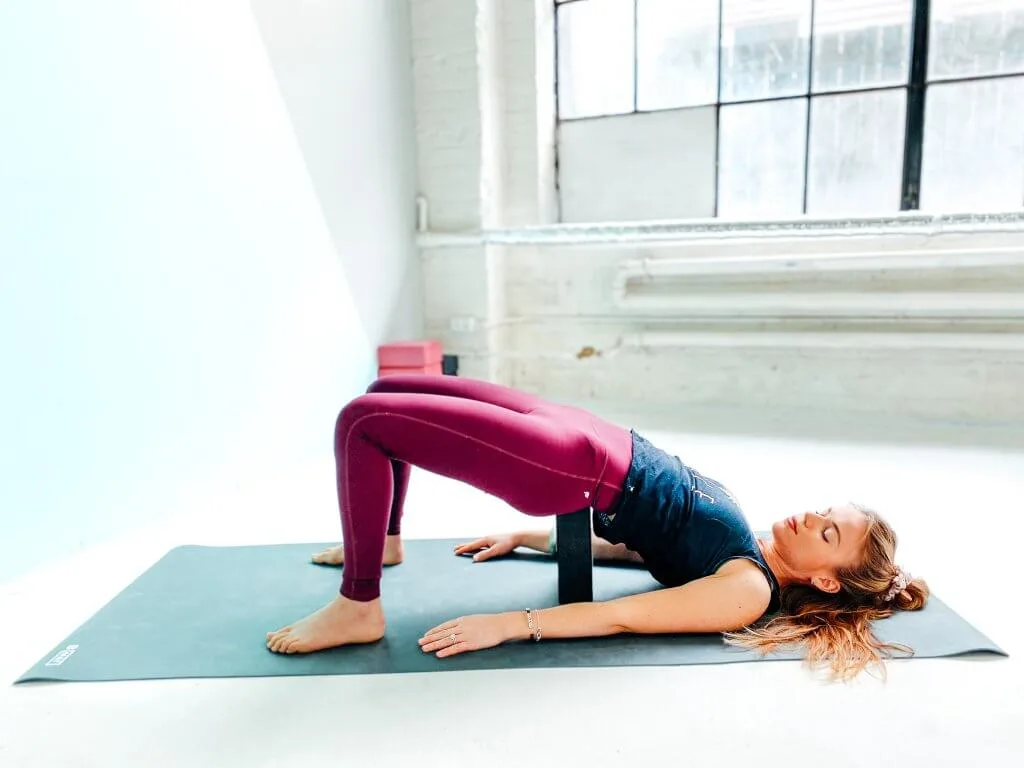
How to Get into this Pose:
- Start on your back, with the soles of your feet on the floor.
- Bring the back of your heels as close to your hips as possible, so you can touch the back of your heels with your finger tips
- Keep your palms on the floor beside you facing down. Take a deep inhale and while pressing your feet and palms into the mat, lift your hips up.
- Gently place a block under your sacrum in a position that is most comfortable for you.
- Continue to rest your head on the mat.
- Stay here for 8-10 deep breaths.
- To come out, first remove the block. Using your core, slowly lower your hips down, one vertebrae at a time.
Modifications:
- Place a bolster under your back, and rest your back on top if you are unable to lift your hips at this point of your yoga journey
- Place your block horizontally (on the flat side), to lower the elevation of the block. This modification is great for those who are unable to go into a deep backbend.
Benefits of this Pose:
- Promotes deep relaxation
- Calms the nervous system
- Helps to relieve anxiety and fatigue
- Can help with relieving headaches and migraines
- Stretch the shoulders and neck
- Improves digestion, respiration and circulation
- Can help with relieving back pains
Knees to Chest Pose

How to Get into this Pose:
- Start on your back, keeping your lower back grounded into the floor as well.
- Bend your knees and bring them to your chest.
- Interlace your fingers around your knees, and squeeze them a little tighter.
- Keep your head and neck grounding into the floor.
- Stay here for 8-10 deep breaths, using your inhale to lengthen, and exhale to bring the knees closer to you.
- To come out of the pose, simply release your hands from around your knees, and lower the legs down.
Modifications:
- If you are unable to interlace your fingers around your knees, place a strap or a rolled up towel around your knees. This will give you additional length.
Benefits of this Pose:
- Reduces lower back pain
- Stretches and stabilizes the pelvis and lower back
- Can help with reducing anxiety and high blood pressure.
- May help with sciatic nerve impingement and muscle spasm.
Corpse (Shavasana) Pose

How to Get into this Pose:
- Extend your legs out, allowing your ankles to rotate outward
- Relax your arms by your side, with the palms facing up.
- Allow your shoulders to relax down and away from the ears, and bring your chin slightly up.
- Stay here for 8-10 deep breaths through the nose, and focus on completely relaxing, letting go of all stress, tension and stiffness.
Modification:
- Place a bolster or rolled up towel under your knees for extra support and elevation
- If you are experiencing back pain, bend your knees and keep the soles of your feet on the floor
Benefits of this Pose:
- Relaxes your whole body
- Calms the mind and soothes the nervous system
- Releases stress, fatigue, tension
- May help with insomnia
To Conclude
The poses listed above are great yoga poses for beginners to start out their yoga journey with. Yoga is a wonderful practice that can benefit everyone in many different ways! If you are looking for free online yoga for beginners classes, click on the link below:
We have a full Yoga for Beginners series on our YouTube channel, so if you enjoyed this class, be sure to check out all the other beginner classes that we have!
Lastly, if you are looking to read more yoga articles that are suitable for beginners, check out our Wake Up Yoga – Best morning Yoga Poses article! I also get a lot of questions regarding which props are best for beginners. I am going to link some yoga props below that can be very helpful in your yoga journey!
Yoga Blocks & Strap

Yoga Blocks are so helpful for beginners (and anyone really). It helps you to get into each pose, without compromising your alignment. In the beginning of your journey, your body might not be flexible enough, and therefore it’s easy to compromise your alignment. However, using blocks enables you to meet your body where you’re at, while keeping proper alignment.
On this same note, yoga straps are a wonderful prop to have as well. They add length, and enable you to get into each pose comfortably, while keeping your alignment. I would highly recommend purchasing these two props, if you’re a beginner.
I hope you find this article helpful, and please feel free to reach out if you have any further questions!
Kind Wishes,
Yana Thompson